Friday, October 26, 2007

Techniques for the Advanced Photographer

A new series from Blue Crane Digital, a company well known for their camera specific beginning photography, how-to dvd's.... And one that I intend to obtain a copy of and review.

For now, a slightly edited version of the company blurb from their web site::

Through the Eyes of a Pro:

A new DVD series aimed at the digital photographer with a little more experience.

"Through the Eyes of a Pro” is a series of training DVDs aimed at developing better photographers using digital equipment and proven approaches.

Volumes 1 and 2 of this series include conversations and photo shoots with famed photographer and teacher, Tim Mantoani.

During the course of these two volumes, you will follow Tim on a stock photo shoot, an outdoor portrait session, a wildlife shoot, and a little league game. In all these situations Tim explains the challenges faced and how to overcome them.

Throughout the presentation, Tim shares experiences and techniques gained over twenty years of shooting athletes, sporting events, weddings, as well as commercial and personal assignments. Hundreds of his photos are included in these DVDs.

Blue Crane Digital has published a two-volume set geared to owners of Nikon DSLRs and another set of volumes for Canon shooters.

During the combined running time of three and one-half hours, Volumes 1 and 2 present the viewer with a structure for developing solid photographic skills. Several photo assignments are presented, along with Tim’s approach to making a great image. Tim also discusses lenses, meters, tripods, and other accessories.

If you own a Digital SLR, even if it is not a Canon or Nikon, the first two volumes in this series can help improve your photography. Spend a few hours with this remarkable photographer and teacher, and see the world through Tim’s eyes.

Available after November 7, 2007 through Amazon:

canon pro file

Canon Volumes 1 and 2

Nikon pro series

Nikon Volumes 1 and 2

Sunday, October 15, 2006

Photo Tip

Some of you may know this, some of you may not. But here's a rule of thumb that might be of help to you, especially if you are just starting out with a new slr or a higher end point and shoot.

If you have started to experiment with using the creative zones (P,S or AV, TV,M) of your camera and not just the preset modes (point and shoot, sports, macro, landscape, etc) then you may have discovered that your photos often come out blurry. You might be blaming this on your camera, your lens, or just your inability to hold the camera stable when hand shooting.

What should you try doing to cure this problem. Well, you could use a tripod, but tripods are bulky and rarely convenient. Is there another solution? Yep, it's call the Reciprical Rule. What does that mean? It means you need a faster shutter speed than what you are currently using. The rule of thumb is to set your shutter speed at or faster than the reciprical of the focal length of the lens being used. In other words, if you are using a 50mm lens (that's the focal length), you will want to set your shutter speed at 1/50th of a second or faster. That would probably be 1/60th. This rule works well up until 300mm. A focal length longer than 300mm is difficult to hand hold anyway.

Another solution that also works well for low light shooting, but can be a bit more expensive than most beginning photographers are willing to pay, is to use VR (vibration reduced) or IS (image stabilized) lenses.

So what do you do if you want to shoot at longer focal lengths than 300mm? Well, if you are not using an imaged stabilized lens, you use a tripod. And, if you have the ability, you use the timer or remote setting of your camera in order to minimize camera shake--in other words give your camera time to settle. And for even clearer photos, assuming you have the ability, you use the mirror lockup function. Will you have to do the same thing with a long focal length VR or IS lens? The answer is, yes you might have to. You can perform a test though to see how stable you are holding the lens.

Take a newspaper page and mount it on a sheet of cardboard. Place this target about 60 feet away from your camera and the lens in question while mounted on a tripod. Focus on the newspaper. Your lens should be a 300mm or longer focal length. Set the mirror lockup on the camera, and use either the timer or the remote setting to take the photo. Next shoot the photo with the same lens and mirror lockup (or without mirror lockup--mirror lockup is really better when used with a tripod), but now shoot by hand rather than with a tripod and remote.

Which photo do you think will be clearer? Unless you have extremely stable hands, my guess is the tripod photo, when blown up will be clearly readable and the handheld shot will be blurry.

Just a little hint that might be helpful to some of you. Remember, not everyone can hold a 300mm lens stable. Some people might have difficulty with a 100 or 200mm. While others, a very few, might be able to hold a 400mm stable without any difficulty.

Which lenses do I use? I prefer Canon image stabilized lenses, but I also have standard Canon zooms and macro lenses as well. Yes, I am a Canon user, but I have nothing against Nikon.

Oh, and for those of you have have a Canon XT series, 10D, 20D or 30D and absolutely love the clarity of the photos you are able to capture with the EF-S 17-85 IS USM, the reason might be, as I was told a few days ago, that this lens is L series quality. Or at least very near. However, because it was designed for the smaller sensor area of the these cameras, it cannot be classified as such. L-series lenses are, afterall compatible with all Canon AF cameras (film or digital). EF-S series are only compatible with a few cameras.

Wednesday, April 12, 2006

Travelling Lessons

No, that doesn't mean lessons on travelling, but rather travelling while learning to shoot from a pro.

Photo safaris like those offered by Joseph Van OS, though expensive can be a wonderful opportunity for the serious amateur or the beginning pro. The groups are often limited to less than a dozen students, and you get to spend time in locations that you might not normally venture into on your own.

I have to admit that this particular group caught my eye because they have a tour of Provence in France in July, and because John Shaw (one of the best nature photographers out there today) is the instructor. What do you expect? I'm a nature photographer, and I'm in the process of planning a trip to the same general area of France, though it will be in early September.

Friday, March 31, 2006

I won't believe it until I see it, but...

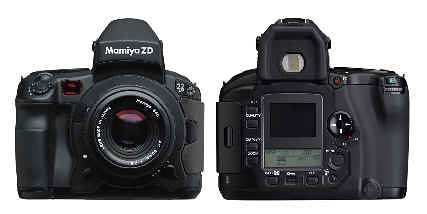
Mamiya has finally launched the ZD!!

mamiya zd

"First announced in 2004 at Photokina, Mamiya has today announced the availability of the 22-million pixel ZD. This medium format digital SLR features a large 48 x 36mm CCD sensor which can capture a 35MB RAW file, is compatible with 645AF lenses and has two memory card slots using CF I/II and SD cards."

And it only took them, well, close to two years to get it actually get it on the market. I have yet to find the ZD listed at any of my favourite photography store sites with an actual price. Most of these sites have had a "coming soon" listing for nearly two years. Still, for those who are interested, here are the latest specifications I could find.

Thursday, March 02, 2006

Nature Photographer on a Budget

That's what I was when I first started out. Ok, things haven't changed much. My paycheck may be a little larger, but I still want the best quality I can get for the least amount of money. Some would say that I am cheap, I prefer the term practical. Besides, let's face facts, photography is not an inexpensive hobby.

The Film Photographer

When I first started out, which wasn't all that long ago, digital cameras did not yet exist. They were a dream soon to be realized, but also to be too expensive for a limited budget amateur to afford for a few years to come. So, I had to make due with my first SLR, a Canon Rebel Xs and the 35-80mm lens that came in the kit. I already knew by this time that I loved nature photography. I also knew that this single lens would not let me get close enough for decent macro shots or zoom in for a tight shot from a distance. I couldn't afford Canon lenses at the time, even the EF series was too expensive. Still, I needed more equipment than I had. I was in a bit of a dilemma, until a friend offered me some advice on how to build up a functional kit bag that wouldn't cost a fortune and would allow me to learn how to take the shots I wanted.

So what did I carry in my bag. Well, in place of the macro lens that I craved I bought a set of Kenko extension tubes--12mm, 20mm and 36mm. These tubes shorten the focal length of any 35mm lens and allow you to focus closer. Sometimes I had to switch to manual focusing, but it was a great deal. Less than a third of the price of the macro lens.

But I also needed a long zoom. I opted for a Sigma 75-300mm zoom and a Kenko 4 element doubler. This, along with a decent tripod, created a very flexible kit for me.

If I were attempt to create this same kit today I would use the following:

Canon::

EF 100mm f/2.8 Macro USM or EF 50mm f/2.5 Macro with Life-Size Converter EF
EF 24-85mm f/3.5-4.5 USM
EF 75-300mm f/4-5.6 III USM
Extender EF 2x II

Nikon::

60mm f/2.8D AF Micro-Nikkor or 105mm f/2.8D AF Micro-Nikkor
28-70mm f/2.8 ED-IF AF-S Zoom-Nikkor or 24-85mm f/2.8-4 D IF AF Zoom-Nikkor
70-300mmf/4-5.6D ED AF Micro-Nikkor
TC-20E II (2x) AF-S, AF-I Teleconverter


Third Party substitutes::

Kenko Extension Tube set, instead of Macro lenses

The Digital Photographer

The kit bag for the digital slr photographer on a budget is not all that different. In this case you have the choice of digital specific lenses, which cannot be used with a film camera, or film lenses, which will work with digital bodies as well. Quite often you will end up with a mixture. Depending on your cameras multiplier 1x (only a few pro bodies), 1.5x (Nikon), or 1.6x (Canon )you may need to use wider angle lenses to achieve the equivalent of the film slr kit.

Canon::

(Assume EOS 20D or Digital Rebel body)

EF-S 60mm f/2.8 Macro USM
EF-S 17-85mm f/4-5.6 IS USM
EF 75-300mm f/4-5.6 III USM
Extender EF 2x II

(EOS 5 body with 1x multiplier)

same as for film body

Nikon::

Use lenses suggested for film body

or

Use Digital specific DX series lenses to replace the zooms. There is no DX macro lens. I do not yet know if the teleconverter is compatible with the Nikon DX series.

Welcome to the Opening Post of The Glass Eye

Those of you who have frequented my other blogs, Timberland Braes among them, know that I am often slow to post. My guess is that my habits will not differ here.

The intent of this blog is to educate myself and my readers on different aspects of photography, whether that be how to take a better photo or what equipment to carry in your bag. And this means that much of what I post here will require research, and possible camera work, on my part, as well.

For those of you who don't know, I am an amateur nature photographer. My preferred equipment, both digital and film is Canon. Currently, my digital slr is a Canon EOS 20D, my film body is a Canon 5E (European equivalent of the Canon A2E). I also use an Olympus E20 digital camera (mostly for macro photography and artistic shots), and, on very rare occassions, an Olympus C720. While it is slow, the latter was my first digital camera, a gift from my father, and fits nicely into a pocket.

Obviously, I lean greatly in favour of Canon and Olympus, however, I try to keep up on the Nikon side of things as well. So, whenever I discuss something equipment specific, I will try to cover the options in all three lines.

More posts to follow.